|
How to Replace the iPad Air 3 Headphone Jack and Flex Cable
Tutorial guide on how to tear down the iPad Air 3 for earphone replacement
Date: 9/18/2020 6:28:39 AM ( 4 y ) ... viewed 218 times The iPad Air 3 earphone is a swappable part on the up left side. To replace the earphone, we need to tear down the display screen. Also, the iPad headphone has a long flex cable ribbon which is adhesive on the panel. Here we would like to show you steps on how to replace the iPad Air 3 headphone.
1. Tear down the iPad Air 3 display screen
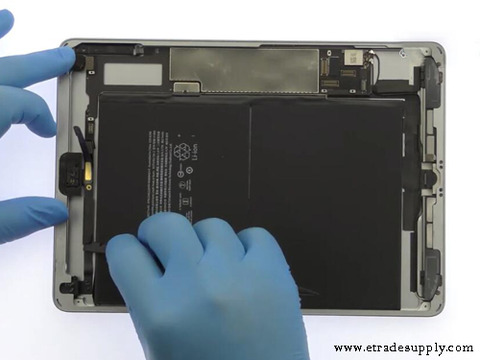
Firstly, we need to power off the iPad. Use 80℃ hot air gun to blow around the edge and four corners for 1-2 mins. Use hard plastic plectrum and metal prying tool to slice around and separate the display. Gently pry and flip up when the iPad display is separated. Unbolt the two screws and take off the metal shield with tweezers. Disconnect the display flex cables and take the display screen away after it is separated completely. Snap off the four screws and remove the metal shield for fixing the internal parts. Here we can see the earphone on the up left side of the iPad.
2. Take off the iPad Air 3 headphone and replace the new one
Disconnect the headphone jack flex. Loosen the screws for fixing the earphone. Use the metal prying tool to pry and separate the earphone flex cable ribbon. Take off the iPad Air 3 earphone with flex cable ribbon from the iPad after it is totally separated. Install the new earphone into the original place and fix it with the screws back. Connect the earphone flex cable to the iPad. Gently press on the flex cable ribbon to make it adhesively paste on the panel. Place the metal shield back and fixing it with the screws.
3. Reassemble the display and test the headphone function
Reverse the teardown step orders. Connect the iPad Air 3 LCD display screen flex cables back and place the metal shield back. Tighten the screws for fixing the flex cables. Assemble the display screen back but past the frame adhesive glue beforehand. Place the display back to the original position, slightly press on the edge, and each corner to make sure it is strictly sealed. Turn on the iPad to test the earphone, check if it is working normally.
As a final notice, the iPad LCD displays screen is easy to break which needs our extra carefulness while tearing down. Don’t try to do it yourself on your iPad at home if you are not familiar with the iPad repair procedure. You may also come to Etrade Supply if you are looking for iPad Air parts for replacement. Contact us if you have any problems with our product or iPad repair, we are glad here to help you.

Add This Entry To Your CureZone Favorites! Print this page
Email this page
 Alert Webmaster Alert Webmaster
| 